Onboard AWS to Yotascale
Prerequisites:
User must have AWS admin rights in each account to be added to Yotascale
Steps to complete:
Step 1: Enable Cost Reports (5 minutes - AWS Console)
Step 2: Configure Access Rights - IAM Policy Configuration (10 minutes - AWS Console)
Step 4: Onboarding the Consolidated Billing Account to Yotascale Software (10 minutes - Yotascale software & AWS Console)
Step 5: Onboarding Linked Accounts to Yotascale Software (10 minutes each - Yotascale software & AWS Console)
This is the table of contents that makes it easy to jump to specific steps:
Step 1: Enable Cost Reports
Note: You may skip this step if you already have your AWS Cost & Usage Report (CUR) configured to go to an S3 bucket and have enabled billing tags.
1. Enable Cost Allocation Tags
Sign in to the AWS Management Console and navigate to the AWS Billing Dashboard.
Navigate to Cost allocation tags.
Select Activate on AWS-Generated Cost Allocation Tags.
Select any tags you want to activate for your report in User-Defined Cost Allocation Tags.
Select Activate.
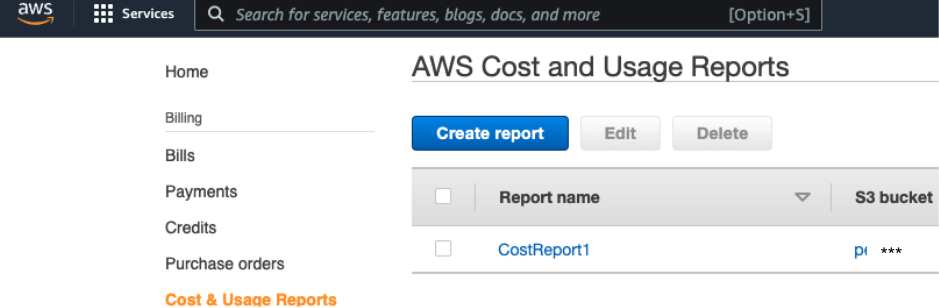
2. Enable Cost & Usage Reports
You can view the guide from AWS here. Specific recommendations follow.
Sign in to the AWS Management Console and navigate to the AWS Billing Dashboard.
In the navigation pane, select Cost & Usage Reports.
Select Create Report.
Enter a name for your report.
Select the checkbox to Include resource IDs.
Select Next.
Select an S3 Bucket.
Report path prefix is not required but is supported. Review the AWS guide for more information here.
Select Hourly time granularity.
The rest of the defaults are set, select Next.
Review your settings, select Review and Complete. It can take up to 24 hours for AWS to start delivering your billing data to S3. Files are updated at least once a day.
Step 2: Configure Access Rights
The Yotascale software supports role-based authentication into AWS. Role-based authentication is the suggested method of authentication by AWS and is described below. The preferred way to create these access rights is to run a CloudFormation stack that creates the role, associated policies, and provisions these rights. Alternatively, one can use the AWS IAM console and create the policies manually based on the policies at the end of this manual.
Option 1: AWS CloudFormation Setup - Consolidated Billing Account (recommended)
Log in to the Yotascale console, you should have received an email to set your Yotascale password. Reach out to support@yotascale.com if you haven't received the email.
Once logged in, click on your initials in the upper right-hand corner of the screen and then select “Manage Connections” to get started adding your AWS Consolidated Billing account to Yotascale.
Click the “Add Account” button, after which a pop-up window for AWS information will appear.
You may use the External ID presented here as an input parameter for the CloudFormation template or you can enter your own custom External ID in the next step.
Launch the CloudFormation stack in the Consolidated Billing account by clicking this link.
Template URL: https://yotascale-onboarding.s3.amazonaws.com/YotascaleManagement.yaml
It's also available for download and review here.
Additional parameters are required for the CloudFormation stack when configuring the Consolidated Billing account:
Enter the External ID copied from the Yotascale console or enter your own custom ID.
Enter the name of the billing bucket where the CUR files are stored
Set the flag for the Tag write policy in order for Yotascale to create, update, and delete tag keys and tag key values.
Set the flag for the RI purchase policy in order for Yotascale to execute the RI purchase based on the recommendation provided.
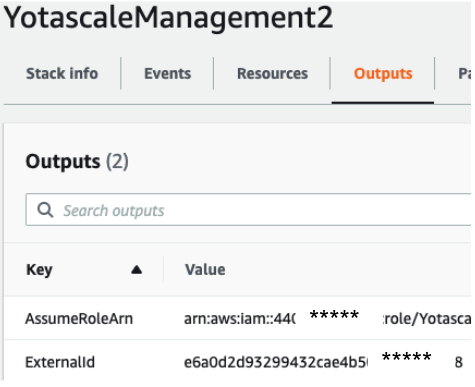
Deploy the stack and then review the CloudFormation output
Copy the ‘AssumeRoleArn’ key’s value from the CloudFormation output
Copy the ‘ExternalId’ key’s value from the Cloudformation output.
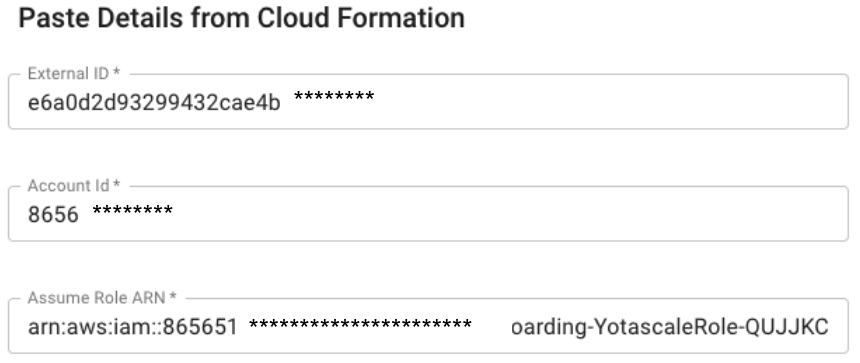
Return to the Yotascale console, and under managed connection click the ‘Add Account’ button if the pop-up window is not still open.
Paste the copied External ID
Enter an Account name to be associated.
Paste the copied Role ARN
Select if you are connecting to the Payer or linked account.
Click Finish.
Add as many of your Linked Accounts as possible to Yotascale to receive utilization-based optimization recommendations and to enable tagging resources at the Linked Account level.
Follow the same steps as above to add linked accounts.
You can add Linked accounts by launching the linked account (Member Accounts) specific CloudFormation template at each Linked Account in AWS.
The same External ID can be used as previously on a new ID can be created or used for each linked account.
Option 2:AWS IAM policy Configuration Setup
Navigate to the AWS IAM console.
Create an IAM Policy in each account you will be onboarding to the Yotascale software for monitoring. The Yotascale software uses READ-ONLY access for all but two use cases: Tagging and RI purchasing. These can be deactivated and core Yotascale software functionality will remain.
Consolidated Billing Policy
Allows access to Billing files, Organization metadata, RI purchasing, Resource tagging & metadata, and CloudWatch metricsLinked Account Policy
Allows access to RI purchasing, Resource tagging & metadata, and CloudWatch metrics
Manually Onboarding AWS Accounts to Yotascale
Providing Yotascale Access with an IAM Role
This is done for every account you want to provide access to the Yotascale software.
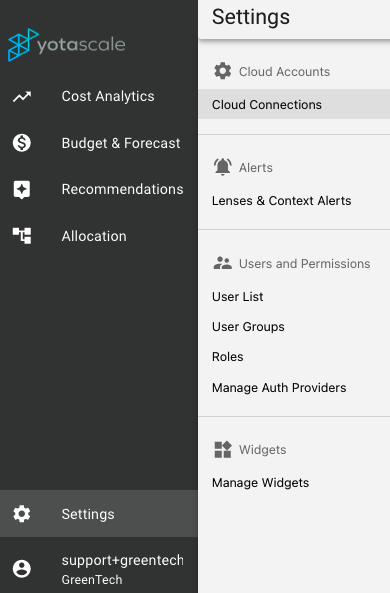
Log in to Yotascale and click on your Settings in the lower left-hand corner.
Select Setting > Cloud Accounts > Cloud Connections
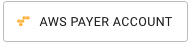
Click on

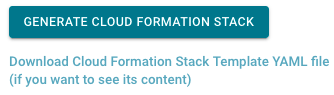
And then
Enter all the fields. The Account Name is a name that it is easy for you to recognize the account, like “GreenTech AWS Production Master Accounts”.
There is an option to allow or not access RI permissions and Tag Writing. We recommend you keep them enabled so that Yotascale gets access to allow us to provide RI recommendations and Tag Management
Run the Cloud Formation Template in your AWS Console that you download from the link. The CloudFormation template includes all the permissions we need to get access to cost data (CUR Files) as well as utilization metrics we need to provide recommendations, and also access to the AWS Trusted Advisor Recommendations.
In your AWS CloudFormation console, open the just created stack and navigate to “Output”
Copy/Past the AWS Cloud Formation Output “ExternalId” and the “AssumeRoleARN” into the Yotascale respective field. The Account ID is your AWS Account ID number
AWS example:
Copy the AWS values to the Yotascale onboarding screen:
Enter the Bucket Name you defined for the AWS Cost & Usage Reports (CUR) from the AWS Billing Console
Click “Next” and enter the Report Name and Prefix Names for your AWS Cost & Usage Reports (CUR)
You can use the “Test Connection” to validate that all works fine and Yotascale now has permissions to read your CUR file
Click “Next” to see the linked (member accounts” that are associated with this Payer (Master) account. You also see the selection of Clusters.
Chose all the Linked/Member accounts you want Yotascale to read Cost data from. Usually, it is all account, so Yotascale can give e you a full picture of your AWS costs.
Once you save the account, Yotascale will start running the data collection and processing. Multiple steps will run sequentially. Additionally, the cost processing will be scheduled to run every day at early mornings in the day, so that you get to see processed data in the morning for the previous day.
The process that will be executed includes:
Copying the latest CUR file
Run cost processing
Run allocation of costs to your business contexts, to all the active Yotascale Lens you have enable
Run Budget & Forecast for all business nodes enable for this module
Run Recommendations for AWS services (discount level, and utilization level)
Run Anomaly Detection
You can always come back to Settings - Cloud Connections to see the status of these processes, look at logs, or change any connection parameters.
You can also come back to add additional Linked/Member accounts that were not onboarding initially
You also come back to onboard additional Clusters (ECS, EKS, K8S)
Appendix A: AWS Policies for Yotascale Software Access
There are two policies listed below. One for the Consolidated BIlling Account (mandatory) and another that is to be used for any Linked Accounts you are adding. Adding Linked Accounts is highly recommended as it provides inventory and utilization data that allows the Yotascale software to find the optimal recommendations and configurations for your cloud deployment. Ensure that the following policy is attached to the IAM Role that you would like to use with the Yotascale software. Don’t forget to replace "YOUR-CUR-BILLING-BUCKET" with your actual CUR billing bucket’s name for the Consolidated Billing Account Policy discussed in the Prerequisites.
Consolidated Billing Account Policy:
{
    "Version": "2012-10-17",
    "Statement": [
        {
            "Sid": "Stmt1454926263000",
            "Effect": "Allow",
             "Action": [
                "autoscaling:Describe*",
                "budgets:ViewBudget",
                "ce:DescribeReport",
                "cloudtrail:Describe*",
                "cloudtrail:List*",
                "cloudwatch:Describe*",
                "cloudwatch:GetMetricStatistics",
                "cloudwatch:GetMetricData",
                "cloudwatch:ListMetrics",
                "dynamodb:Describe*",
                "dynamodb:List*",
                "ec2:Describe*",
                "ecr:Describe*",
                "ecr:List*",
                "ecs:Describe*",
                "ecs:List*",
                "eks:Describe*",
                "eks:List*",
                "elasticache:Describe*",
                "elasticloadbalancing:Describe*",
                "elasticmapreduce:Describe*",
                "elasticmapreduce:List*",
                "glacier:Describe*",
                "glacier:List*",
                "kinesis:Describe*",
                "kinesis:List*",
                "lambda:List*",
                "logs:DescribeLogGroups",
                "logs:DescribeQueries",
                "logs:GetLogGroupFields",
                "logs:GetQueryResults",
                "logs:StartQuery",
                "logs:StopQuery",
                "rds:Describe*",
                "rds:ListTagsForResource",
                "redshift:Describe*",
                "route53:Get*",
                "route53:List*",
                "s3:ListAllMyBuckets",
                "s3:GetBucketLocation",
                "s3:GetBucketTagging",
                "sns:Get*",
                "sns:List*",
                "sqs:Get*",
                "sqs:List*",
                "trustedadvisor:Describe*",
                "workspaces:Describe*",
                "savingsplans:DescribeSavingsPlans",
                "support:DescribeTrustedAdvisorChecks",
                "support:DescribeTrustedAdvisorCheckResult"
            ],
           "Resource": [

                "*"
            ]
        },

        {
            "Sid": "Stmt1454926263005",
            "Effect": "Allow",
            "Action": [
                "s3:GetObject",
                "s3:ListBucket",
                "s3:GetAccelerateConfiguration"
            ],

            "Resource": [
                "arn:aws:s3:::YOUR-CUR-BILLING-BUCKET/*",
                "arn:aws:s3:::YOUR-CUR-BILLING-BUCKET"
            ]
        },

        {
            "Sid": "Stmt1454926263003",
            "Effect": "Allow",
            "Action": [
                "organizations:List*",
                "organizations:Describe*",
                "ce:Get*",
                "cur:Describe*"
            ],
            "Resource": [
                "*"
            ]
        },

        {
            "Sid": "Stmt1454926263002",
            "Effect": "Allow",
            "Action": [
                "ec2:*Tags*",
                "autoscaling:*Tags*",
                "rds:*Tags*",
                "redshift:*Tags*",
                "s3:*Tagging*",
                "elasticache:*Tags*",
                "elasticloadbalancing:*Tags*",
                "cloudtrail:*Tags*",
                "elasticmapreduce:*Tags*",
                "glacier:*Tags*",
                "kinesis:*Tags*",
                "route53:*Tags*",
                "workspaces:*Tags*",
                "dynamodb:TagResource",
                "dynamodb:UntagResource",
                "lambda:TagResource",
                "lambda:UntagResource"
            ],

            "Resource": [
                "*"
            ]
        }
    ]
}
Linked Account Policy
{
"Version": "2012-10-17",
"Statement": [
        {
            "Sid": "Stmt1454926263000",
            "Effect": "Allow",
            "Action": [
                "autoscaling:Describe*",
                "budgets:ViewBudget",
                "ce:DescribeReport",
                "cloudtrail:Describe*",
                "cloudtrail:List*",
                "cloudwatch:Describe*",
                "cloudwatch:GetMetricStatistics",
                "cloudwatch:GetMetricData",
                "cloudwatch:ListMetrics",
                "dynamodb:Describe*",
                "dynamodb:List*",
                "ec2:Describe*",
                "ecr:Describe*",
                "ecr:List*",
                "ecs:Describe*",
                "ecs:List*",
                "eks:Describe*",
                "eks:List*",
                "elasticache:Describe*",
                "elasticloadbalancing:Describe*",
                "elasticmapreduce:Describe*",
                "elasticmapreduce:List*",
                "glacier:Describe*",
                "glacier:List*",
                "kinesis:Describe*",
                "kinesis:List*",
                "lambda:List*",
                "logs:DescribeLogGroups",
                "logs:DescribeQueries",
                "logs:GetLogGroupFields",
                "logs:GetQueryResults",
                "logs:StartQuery",
                "logs:StopQuery",
                "rds:Describe*",
                "rds:ListTagsForResource",
                "redshift:Describe*",
                "route53:Get*",
                "route53:List*",
                "s3:ListAllMyBuckets",
                "s3:GetBucketLocation",
                "s3:GetBucketTagging",
                "sns:Get*",
                "sns:List*",
                "sqs:Get*",
                "sqs:List*",
                "trustedadvisor:Describe*",
                "workspaces:Describe*",
                "savingsplans:DescribeSavingsPlans",
                "support:DescribeTrustedAdvisorChecks",
                "support:DescribeTrustedAdvisorCheckResult"
            ],

            "Resource": [
                "*"
            ]
        },

        {
            "Sid": "Stmt1454926263002",
            "Effect": "Allow",
            "Action": [
                "ec2:*Tags*",
                "autoscaling:*Tags*",
                "rds:*Tags*",
                "redshift:*Tags*",
                "s3:*Tagging*",
                "elasticache:*Tags*",
                "elasticloadbalancing:*Tags*",
                "cloudtrail:*Tags*",
                "elasticmapreduce:*Tags*",
                "glacier:*Tags*",
                "kinesis:*Tags*",
                "route53:*Tags*",
                "workspaces:*Tags*",
                "dynamodb:TagResource",
                "dynamodb:UntagResource",
                "lambda:TagResource",
                "lambda:UntagResource"
            ],

            "Resource": [
                "*"
            ]
        }
    ]
}