Console Navigation for Tag Manager
This article is intended to familiarize you with the Tag Manager console. You’ll be able to find definitions for commonly used terms when navigating Tag Manager and see the technical documentation for what each console element does.
Terms To Know
- Saved search - When searching for resources, you have the option to save that search for future use. If you view a particular set of resources often, want to monitor the tag health of these resources, or want to create auto-tagging policies, you’ll need to create saved searches.
- Tag policy - Simply put, these are the policies you want enforced in your tagging. Tag policies define what constitutes a valid or invalid tag in your system. Your tag policies directly impact your resource tag health and you can use them to remediate tag hygiene issues that you uncover.
- Auto-tagging rules - Auto-tagging rules are the mechanism by which Tag Manager manages your tags. By creating auto-tagging rules for sets of resources, you can ensure that all current resources and any new ones will be tagged appropriately. Auto-tagging rules are separate from tag policies. You can implement auto-tagging rules that violate defined tag policies, but this is not recommended. If you do this anyway, the monitoring part of Tag Manager will catch it so that you can remediate.
Console Navigation
There are 3 primary tabs that you can navigate through in Tag Manager. You can access each of these in the menu at the top of the page.

Search
This is the landing page for Tag Manager. See How-To Guides for Tag Manager for what you can do from this page:
- Search for and view AWS resources
- Save groups of tags for use in automated tagging policies
- See your overall AWS resource tag health
Search Filter

- Upon clicking the Select saved searches field, a drop-down menu will appear that contains all saved searches. If you start typing, the list will be dynamically filtered based on your input. You can select a saved search directly from this list to add them to the filter. Selecting a saved search while other fields are populated will replace all filters with those preloaded from the saved search. Selecting a saved search will automatically run the selected search.
- If you have selected a previously saved search, the Discard button will become active, giving you the option to delete the saved search. Upon clicking the Discard button, you will be prompted to confirm your decision to delete the saved search.
- The AWS Account field can either be preloaded or blank depending on whether or not you have selected a saved search. There is no limit on the number of AWS accounts you can include in the filter. Upon clicking into the field, a drop-down list will appear with all connected AWS accounts. If you begin typing, the list will be dynamically filtered based on your input. You can select AWS accounts directly from this list to add them to the filter.
- The Resource Types field can either be preloaded or blank depending on whether or not you have selected a saved search. There is no limit on the number of AWS resource types you can include in the filter. Upon clicking into the field, a drop-down list will appear with all available AWS resource types. If you begin typing, the list will be dynamically filtered based on your input. You can select AWS resource types directly from this list to add them to the filter.
- The AWS Region field can either be preloaded or blank depending on whether or not you have selected a saved search. There is no limit on the number of AWS regions you can include in the filter. Upon clicking into the field, a drop-down list will appear with all available AWS regions. If you begin typing, the list will be dynamically filtered based on your input. You can select AWS regions directly from this list to add them to the filter.
- If you click Show Advanced Search Options, additional filtering options will become available. See Advanced Search Options for further detail.
- Upon clicking Clear, all search filters will be cleared. If a saved search is selected, it will not modify the saved search.
- Upon clicking Search, all selected filters will be applied to your AWS resource tags and relevant results will be displayed.
- Upon clicking Save Search, you will be prompted to confirm that you want to save the search. You will be unable to save a search until at least one filter has been added.
- If you have selected a saved search, the prompt will warn you that the saved search already exists and provide the option to create a new one instead. Enter a new name for the saved search to create a new saved search with the given parameters, or simply confirm to update the selected saved search with the given parameters.
- If you have not selected a saved search, the prompt will ask you to enter a new name and confirm. Once you confirm, a new saved search with the given parameters will be created.
Advanced Search Options

- Clicking Hide Advanced Search Options will minimize these Advanced Search Options. However, any filter selections made here will still be applied when a search is run.
- Toggle whether AWS system tags are included in the search
- For each of the queries you can enter in (4), this operator determines whether the queries will be evaluated together using the boolean AND or OR operator.
- You can query tags by individual key-value pairings. These key-value pairings are identical to the way you tag AWS resources and map directly to this search filter. Between the Key and Value fields are drop-down options that allow further filtering based on key-value pair matches.
- If you click the Is Present drop-down, you’ll be presented with two options: Is Present and Is Missing. Is Present indicates that the tag value is present, and you can then further select a comparison operator. Is Missing indicates that a resource has the chosen tag key but is missing a tag value.
- If you click the Equal drop-down, you’ll be presented with a number of matching operators between the Key and Value in the pair: Equal; Like; Not Equal, Is Null, Is Not Null, Is Invalid. This drop-down menu is only available if you have selected Is Present from the preceding drop-down menu.
- The Resource Filter field allows you to choose whether you only want to see resources that meet a certain tagging criteria: Tagged; Untagged; Invalid Tags; or Missing Tags.
Resource Tag Health
The Resource Tag Health section of the Search page indicates the overall health of your AWS resources as they relate to being fully tagged. This health indicator displays information that is based on the group of tags that you have filtered for in the search function.

- The high-level indicator of your resource tag health. This is broken down by Tagged, Partially Tagged, and Untagged resources. Ideally, you want to get as close to 100% Tagged as possible.
- Tagged - These are resources that meet all tagging policies
- Partially Tagged - These are resources that violate at least 1 tagging policy
- Untagged - These are resources that have no tags at all and thus violate all tagging policies
- A list of the top 5 tag key-value pairings are presented across your AWS resources.
- A list of the top 5 resources where a tag key exists but the tag value is null.
- For each tag key, you can configure a regex policy that is validated against tag values for resources using that tag key. If a resource is using a tag key that has a regex policy and violates the policy, it is an invalid tag. This is a list of the top 5 tag values that violate these policies.
- For each tag key, you can define whether that key is mandatory for each resource. A resource that is missing any of these mandatory tag keys is considered as missing tags. This is a list of the top 5 mandatory keys that are missing across your AWS resources.
Search Results (All)

The Search Results (All) table display shows all resources that match the specified filter criteria.
- Upon clicking this option, all search results currently displayed will be selected. Clicking again will deselect all current displayed results.
- You can choose to display 10, 25, or 50 search results at a time
- If you have selected any search results, you will have the option to bulk update the selected tags. See Bulk Updating Tags for further details.
- If there are multiple pages of results, you can use the left and right arrows to navigate through them all.
- You can select this dropdown to display details about each of the resources that match the key-value pair for the selected row. See Viewing Resource Details for further details.
Bulk Updating Tags
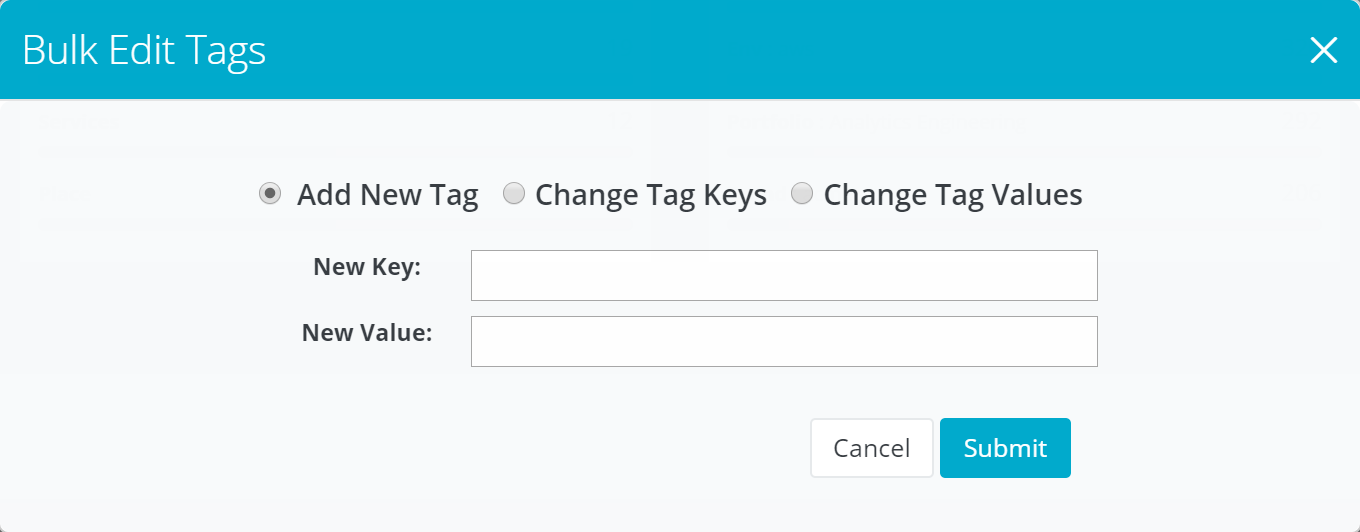
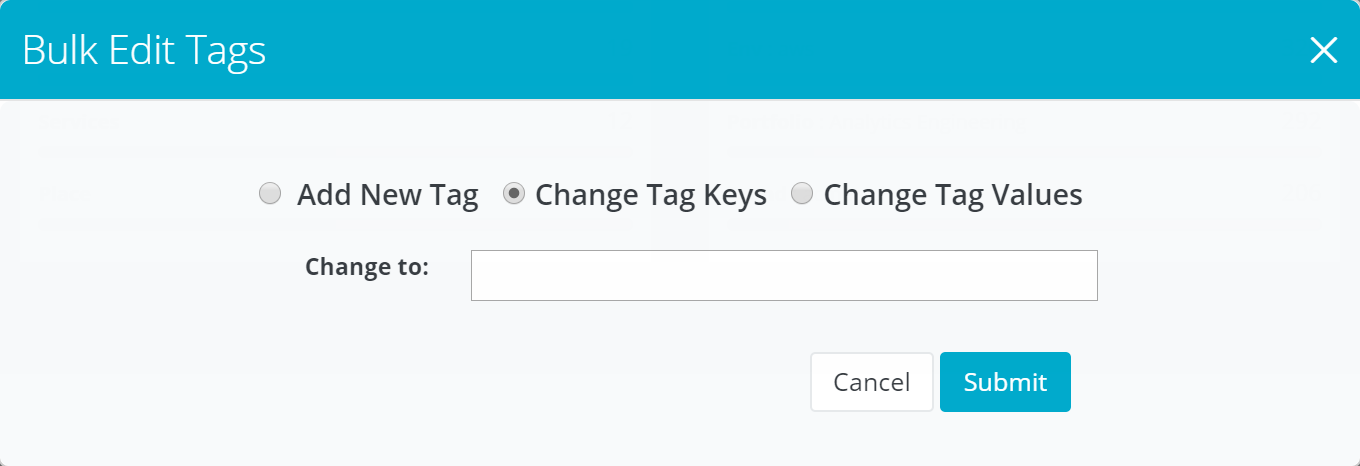
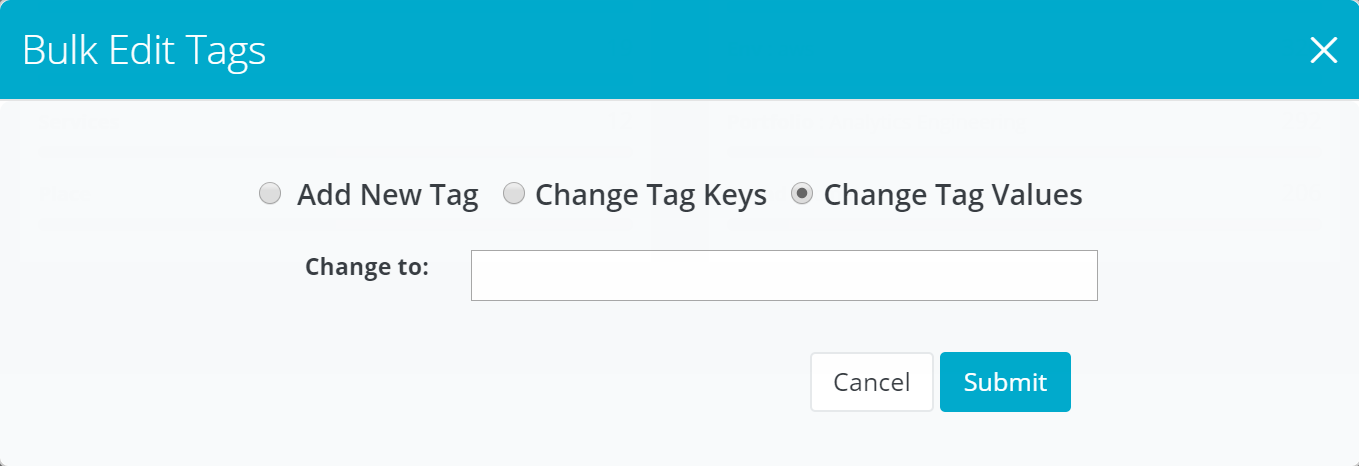
Upon clicking Bulk Update in Search Results (All), you will be presented with a pop-up dialog that presents three options: adding new tags, changing tag keys, and changing tag values.

- For all selected resources, new tags will be added with the provided key-value pair. See the image for what the screen looks like when selecting this option.
- For all selected resources, the key in the tag key-value pair will be updated to the new key provided. See the image for what the screen looks like when selecting this option.
- For all selected resources, the value in the tag key-value pair will be updated to the new value provided. See the image for what the screen looks like when selecting this option.
Viewing Resource Details
Upon clicking the drop-down menu, you will be presented with a list of all AWS resources that contain the specified Tag Key and Tag Value.

- This is the main view for each individual resource. You will be presented the Resource ID, Account, Region, Resource Type, Sub Resource Type, and a list of all Tags associated with that resource.
- A maximum of 5 resources at a time can be displayed. You can navigate resources 5 at a time by using these navigation arrows.
- You can click this to hide the resource details and return to the original Search Results (All) view.
Search Results (Untagged)
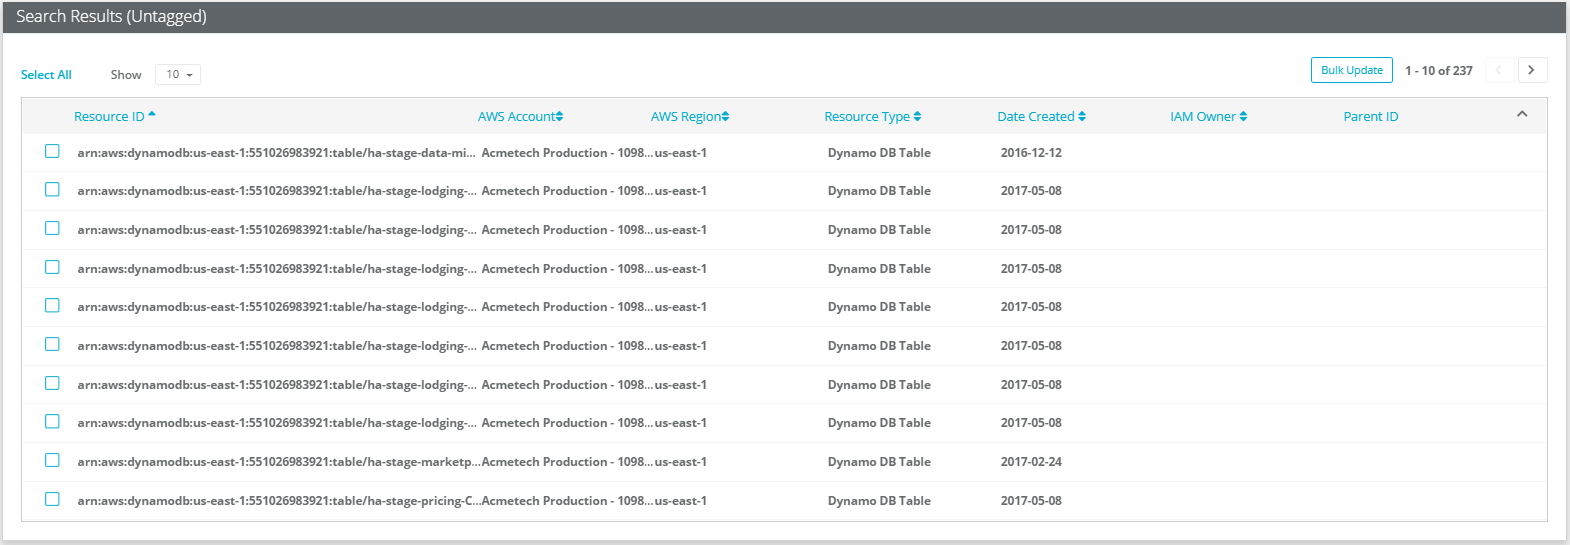
The Search Results (Untagged) table display is nearly identical to the Search Results (All) in terms of functionality. The primary difference is that for untagged resources, resource information is displayed in terms of raw resource data pulled from AWS such as the Resource ID. Each untagged resource is mapped back to an AWS account, region, resource type, created date, IAM owner if one exists, and parent ID if one exists.
Policy Configuration
On the Policy Configuration page, you can:
- Map tag keys to tag categories to make policies active
- Define regex policies for your tags that validate your tag values
- Define whether a tag key is mandatory for all resources
- Edit tag categories defined for your infrastructure
See Configuring tag policies in How-To Guides for Tag Manager to follow the workflow for this page.
Tag Policies

- Whether or not to show AWS system tags
- Whether or not to show historical tags. When this is toggled off, only tag keys currently in your AWS infrastructure will be shown. When toggled on, every tag key that has ever been present in your AWS infrastructure will be shown.
- Upon clicking this button, any changes you have made to tag policies will be saved and applied to current tags.
- Upon clicking this button, any changes you have made on the page will be discarded. This will not clear the search bar or currently displayed results. Note that there is no confirmation dialog when discarding so changes will be immediate.
- The displayed tag policies will dynamically be filtered based on your input into the search bar. The search returns results if the input is contained in any of the Key, Policy, or Mapped To fields.
- The key of the tag key-value pair. Keys are case-sensitive, which is important to note when configuring a tag policy. This list will surface all unique keys from all tags.
- Use regular expressions (regex) to configure a tag policy for all tags using the selected key. The input regex will be used to validate all tag values that use the chosen tag key. Note that if the chosen tag key is not mapped to a tag category, this regex expression will not be evaluated.
- Indicates whether or not the selected tag key is mandatory for all AWS resources
- You can map the tag key to any tag category you have defined in your settings. All defined tag categories are available in the drop-down menu. If no tag category is selected, the tag policy will not be applied to any resource.
- You can edit the tag categories you have defined right from this screen. See Editing Tag Categories for further details.
Editing Tag Categories
Upon clicking the settings button on the Policy Configuration page, you will be presented with a pop-up dialog from where you can update the tag categories you have defined.
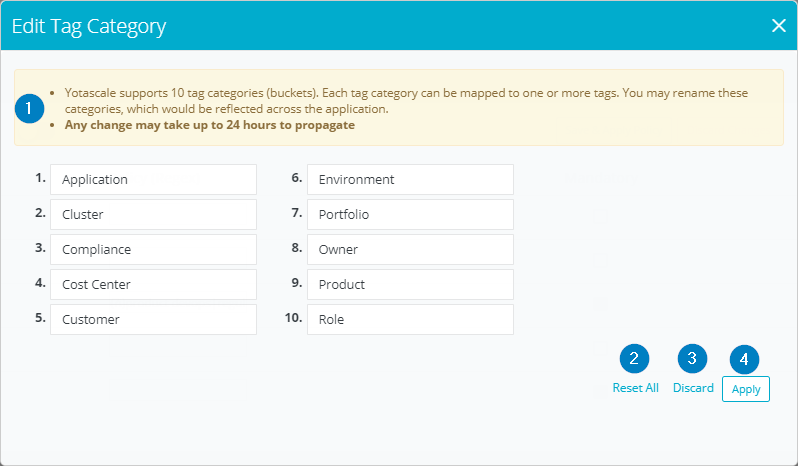
- The info box explains any crucial pieces of information necessary to understand how tag categories can be created and mapped, as well as how long you should expect to wait before changes are applied.
- Upon selecting this option, all tag categories are reset to the system defaults. Note that there is no confirmation dialog when resetting so changes will be immediate.
- Upon selecting this option, all changes will be discarded and you will be returned to the Policy Configuration page. Note that there is no confirmation dialog when discarding so changes will be immediate.
- Upon selecting this option, all changes will be saved and applied and you will be returned to the Policy Configuration page.
Auto-Tagging Rules
From the Auto-Tagging Rules page, you can:
- Create new tagging rules to automatically update tags based on your saved tag groupings (saved searches)
- Edit existing tagging rules to change how tag groupings (saved searches) are automatically updated
- Delete existing auto-tagging rules
See How-To Guides for Tag Manager for what you can do from this page.
Auto-Tagging Rule Details

- Upon selecting this option, you will be prompted to create a new auto-tagging rule. See Adding New Rules for further details.
- Each saved search that has an auto-tagging rule associated with it will appear here. Saved searches are created on the Search page. Auto-tagging rules can only be applied to tags grouped by saved search.
- There are two kinds of auto-tagging rules available for application: Add New Tags; and Inherit From Parent. See Adding New Rules for further details on what these mean.
- An indicator of whether or not the rule is currently being executed
- Upon selecting this option, you will be prompted to edit the selected auto-tagging rule. See Editing Existing Rules for further details.
- Upon selecting this option, you will be prompted to confirm whether you want to delete the selected rule. You can select Cancel to do nothing, or Delete to delete the rule.
Adding New Rules
Upon clicking Add New Policy on the Auto-Tagging Rules page, you will encounter the following pop-up from where you can create a new rule to apply to a given saved search.

- Upon clicking the drop-down menu, you will be presented a list of all saved searches. This list will be dynamically filtered as you start typing.
- Upon clicking the drop-down menu, you will be presented with two options: Add New Tags; and Inherit From Parent.
- If you select Inherit From Parent, all current tags for the selected resources will be inherited from the parent resources.
- If you select Add New Tags, all current tag values for the selected resources that match the provided tag keys will be overwritten.
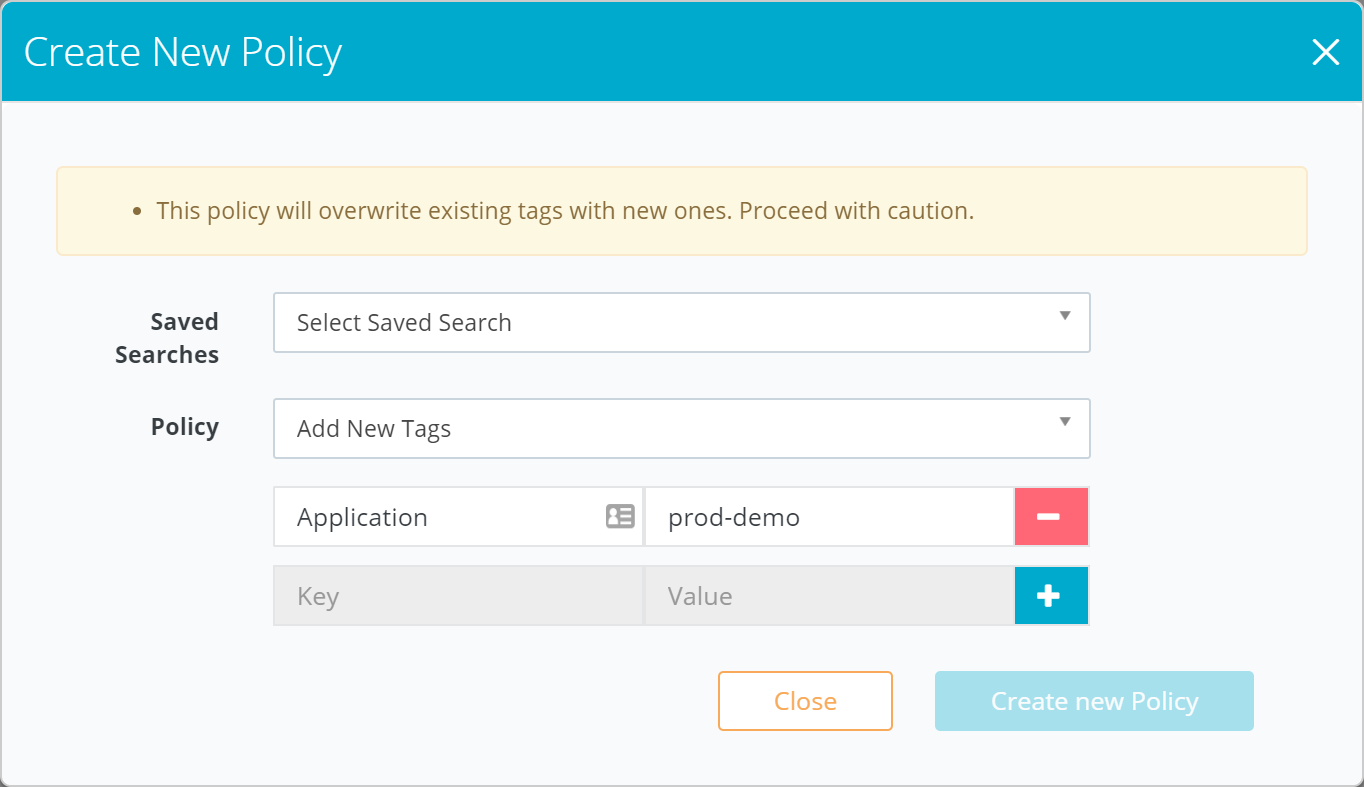
If you select Add New Tags, you will be prompted to enter the set of key-value pairs with which you’d like to tag your selected resources. There is no limit to how many tags you can add. Note that by adding a new set of tags, all current tag values for the selected resources that match the provided tag keys will be overwritten with the new tag values defined here.
- Upon clicking this, the pop-up will close and you will be returned to the Auto-Tagging Rules page with no changes made. Note that you will not be warned before your changes are discarded.
- Upon clicking this, the auto-tagging rule you have created will be applied to the selected saved search. Note that you cannot create two of the same rule for the same saved search. In addition, note that by saving this new rule, all current tags for the selected resources will be overwritten based on the rule being applied.
Editing Existing Rules
Upon clicking Edit on the Auto-Tagging Rules page for a selected saved search, you will encounter the following pop-up from where you can edit the current auto-tagging rule that is being executed for the saved search.
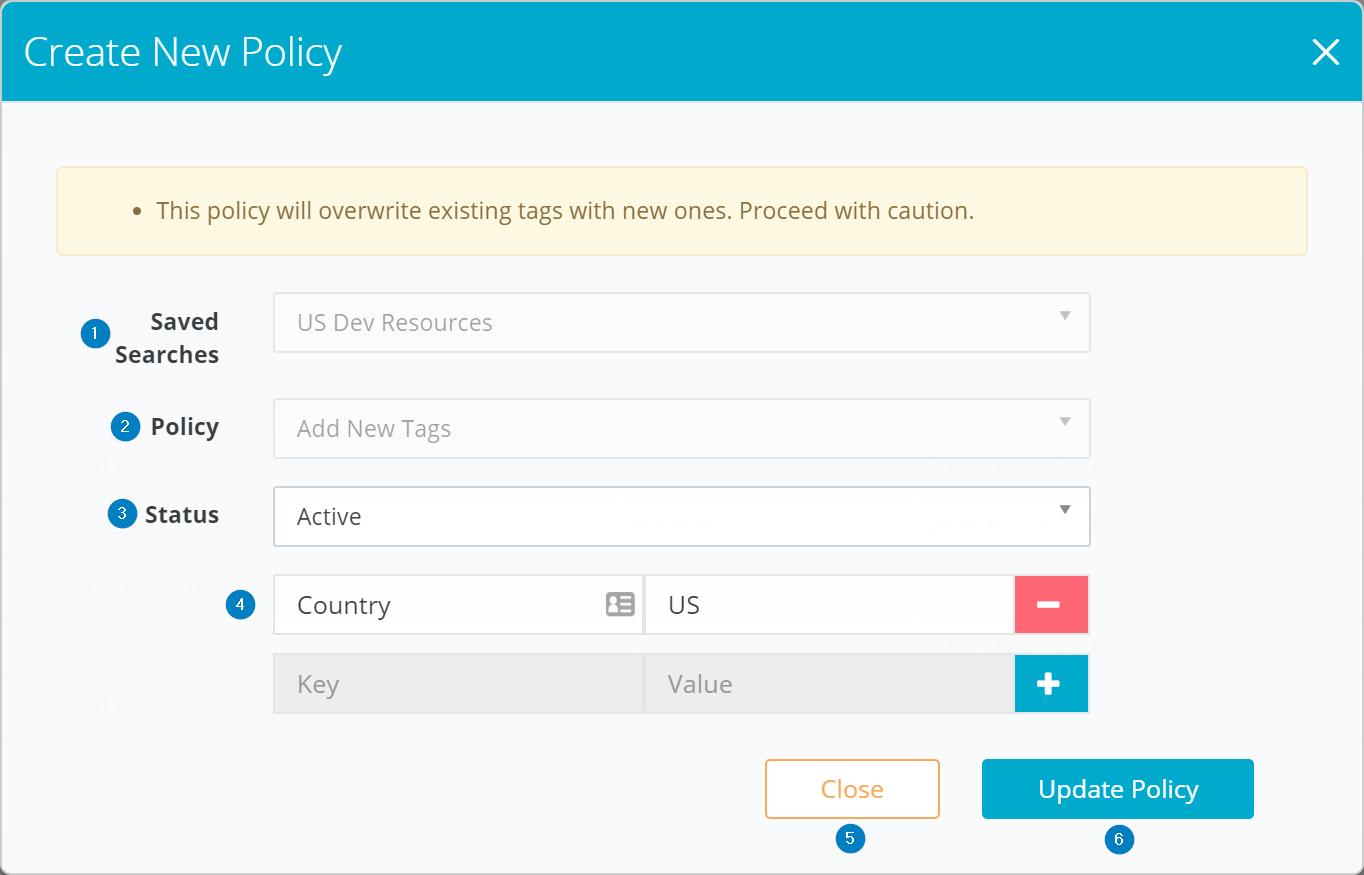
- You cannot change which saved search this auto-tagging rule is being applied to. If you want to apply this rule to a different saved search, you will need to create a new rule.
- You cannot change the rule that is applied to this saved search. If you want to change the rule that is applied to this saved search, you will need to create a new rule for the specified saved search.
- The drop-down menu will give you the option of making this rule Active or Inactive. Inactive rules will not be executed.
- If the rule being edited is Add New Tags, you will be able to add as many tag key-value pairs as you need. If the rule is Inherit from Parent, this section will not be available.
- Upon clicking this, the pop-up will close and you will be returned to the Auto-Tagging Rules page with no changes made. Note that you will not be warned before your changes are discarded.
- Upon clicking this, the auto-tagging rule you have edited will be applied to the selected saved search. Note that by saving these edits, all current tags for the selected resources will be overwritten based on the rule being applied.
